Tuesday, October 29, 2013

DIY

Written by Decadent Details Events Assistant, Mallory Worstell


As Do-It-Yourself projects are becoming more and more popular, we are beginning to see a lot more DIY aspects incorporated into weddings. This can be a huge advantage for brides who don’t have an extravagant budget, but still want an extravagant wedding day. Many brides may think there is no way around the expensive invitations, wedding décor, and so on. But with a little imagination and creativity there are many options to make your big day look outstanding without hurting your pocketbook.
Bouquets
Who said the bride’s bouquet was limited to flowers alone? Creativeness is never-ending when it comes to your bouquet. Add some pizazz with crystal embellishments and ribbon. Incorporate your wedding colors through colorful rhinestone brooches or fabrics. Flowers can take up a huge amount of a bride’s budget. By using fewer flowers, and more creativity, a bride is able to still have her dream day while being budget friendly.
 
 
Centerpieces
Paper lanterns are an extremely low-cost alternative to the traditional table décor. These lanterns are easy to find, and come in a large assortment of shapes, sizes, and even colors. Mixing up the varieties can be an easy way to fill a little table space, while still looking very appealing. Adding a few candles and flowers to this table arrangement can be the perfect finishing touch.

 
Entertainment
Guests will have a great time in this creative photo booth idea. Include random props such as clown noses, mustaches, thinking bubbles and glasses and let the fun begin! An assortment of picture frames is also a great way to make the ‘photo booth’ effect come to life. Guests will hold on to these pictures and memories for a lifetime and you won’t have to break your budget!
 

Get inspired by trying out some of these do-it-yourself projects for your wedding day. Not only will these unique projects stand out to your guests, but they will also play a huge part in saving you money on your big day!


Sunday, October 27, 2013

LGD?!?

You said "YES"! Then chose the "Perfect Dress" that made you and your Mom cry the moment you came out of the dressing room! The next dress you need to choose is the dress your Maids are going to wear! Every girl knows an LBD is the go to dress! Audrey Hepburn and Givenchy made it famous in the movie "Breakfast at Tiffany's" and the trend began...a classic LBD works for almost every occasion!


Why not put a twist on the "Go-To LBD" by putting your "Maids on the Best Dressed List", and let them take cover in an LGD! LGD, you ask...Little Green Dress of Course! Pick a style and a shade they will love now and forever as a cocktail party "go to"!

Here are some of are favorites which will sure to become their favorites as well!


Having an evening wedding, opt for a long style which would look good as a shortened version as well to give your ladies more options afterwards!
 
Let us know, would you choose LGD's for your Bridesmaids?


Tuesday, October 22, 2013

What is a Bononniere?

Wedding favors are small gifts given as a gesture of appreciation or gratitude to guests from the bride and groom during the ceremony or a wedding reception.

The tradition of distributing wedding favors is a very old one. It is believed that the first wedding favor, common amongst European aristocrats, was known as a bonbonniere. A bonbonniere is a small trinket box made of crystal, porcelain, and/or precious stones. The contents of these precious boxes were generally sugar cubes or delicate confections, which symbolize wealth and royalty. (In this era, sugar was an expensive commodity and was treasured only among the wealthy. It was believed that sugar contained medical benefits). As the price of sugar decreased throughout centuries, the tradition of providing gifts to guests reached the general populace and was embraced by couples of modest means.

As sugar became more affordable, bonbonnieres were replaced with almonds. For centuries, almonds were commonly distributed to wedding guests to signify well wishes on the bridegroom’s new life. In the thirteenth century, almonds coated with sugar, known as  confetti, were introduced. Confetti soon transformed to sugared almonds, which later evolved into the wedding favor for modern day weddings. Traditionally, five Jordan almonds are presented in a confection box or wrapped in elegant fabric to represent fertility, longevity, wealth, health and happiness. The bitterness of the almond and the sweetness of the coated candy are a metaphor for the bitter sweetness of a marriage.

Today, gifts to guests are commonly known as wedding favors and are shared in cultures worldwide. Wedding favors have become a part of wedding reception planning, especially in the United States and Canada. Wedding favors are diverse and usually complement the theme or season of the event. Classic favors can range from the classic sugared almonds or individual chocolates to candles and scented soaps. Modern gift trends include: CDs with the favorite music of the bride and groom, shot glasses filled with colored candy or silver picture frames with a photo of the couple. Gifts may also be personalized with the couple's names, initials or wedding date.Link

 
The Groom's Favorite
Apple Cider Jelly
 
 
Personalized Champagne Flutes


Eco-Friendly Bird Feeder Favors


Personalized Wine Labels
 
What bonbonniere will you use to say Thank You to your guests?
 

Sunday, October 20, 2013

Happy 1 Year Anniversary, Teina & Tanner!

Congratulations Teina & Tanner on your 1 Year Anniversary!


 “Tanner asked if I would like dessert, but before the words even left my mouth, there came a beautifully displayed plate, with the words written Will You Marry Me in strawberry puree...my eyes could not stop admiring the sparkle of the symbol of our love...there I was sitting in a picture perfect moment!” 
 
 
Teina chose an elegant-classy style & was married under a pergola, designed & created by her Uncle, draped in purple organza with a lighted chandelier. 
 
 
The room was flipped to create a black-tie reception with 4 different styles of centerpieces & a sweetheart table inside the beautiful pergola. 


But words could not express the atmosphere of the room as Tanner held Teina during her father/daughter dance while guests watched a slide-show of “Daddy’s Little Girl” photos in remembrance of Teina’s amazing father who passed away just a year ago.  
 
We are honored, you chose us to be a part of your special day! Congratulations and best wishes for an amazing future together!


Sunday, October 13, 2013

Happy 1 year Anniversary, Leigh & Ryan!

One year ago today, Leah Sullivan and Ryan Jones said "I Do"?!


It was a beautiful October day, only made more beautiful by the smiles and love shared by these two on their Wedding Day!  

Rustic-chic...what a perfect way to describe Leigh’s style for her beautiful reception inside Building 8 at the Franklin Factory.  The rough-wood, beamed ceiling was countered with smooth white linens and centerpieces of burlap & Mason jars filled with soft pastel floral.  A gorgeous grape-vine wreath with small yellow & white flowers hung above the cake & cupcake table to pull in yet another element of flair.  To complement Leigh’s rustic style, a nice bit of chic was mixed in by using mercury glass votive candles on the guest tables then enormous mercury glass vases filled with birch branches & silver chargers on the regal bridal party table.


Leigh & Ryan's 1st Dance of many as Husband & Wife!
 
 
Happy Anniversary Leigh & Ryan! We are honored, you chose us to be a part of your special day! We wish you many more cherished years to come!  

XO! Kelly & Susan

Beautiful from Head-wear to Toe!

Written by Decadent Details Events Assistant, Mallory Worstell


Making sure our bride looks breath-taking from head to toe is a must, so first we must start from the top!

With traditional wedding veils quickly becoming a thing of the past, the contemporary bride can explore plenty of alternative head pieces to get the right look for her picture-perfect day.

Crystal embellished forehead bands are a beautiful option for a more daring bride wanting to show off her more glamorous side. All eyes are sure to be on her with this flashy piece!  


Make a huge statement by sporting an oversized hat down the aisle. This fun but elegant option will definitely have the heads turning. The bigger the better!
 
 
Whimsical flowered headbands are perfect for an outdoor wedding. Paired with a long flowing dress and loose curls, this simple detail to your hair will be the perfect finishing touch.
 
 
Brooches are a great option for brides who have an up-do on their wedding day. Adding a hint of bling to your look can be super easy just by using a simple clip. 


Get the best of both worlds with a birdcage veil. The birdcage veil is our personal favorite...it marries traditional with modern! One of our recent brides, TraVonda is stunning with the one she chose!
 
 
Exploring the alternatives to the traditional bridal style can be a great start to adding your own flare to your wedding day look. Regardless if you are shabby chic, rustic or a bit more modern over conventional, swapping the wedding veil with one of these great options could be the perfect inspiration to get your style ideas turning!

Tuesday, October 8, 2013

A Wedding Planner Planning Her Own Wedding

Written by Hailey Diane Williams


After a year and a half of dating, “IT” happened.  I was engaged!  As exciting as this time was for me, I had no idea of the stress that would fill my life in a matter of months.  As a planner, I did not foresee me being a bride, that at the last moment would be nothing but nerves, but boy was I wrong because I was all nerves.  As our procession was in line, I thought I was going to faint.  It was not just that moment that pushed me to the lightheadedness, but everything that built to that exact time.

In order to really appreciate my haywire nerves and near complex, I will start from the beginning.  My husband, Tyler, proposed to me on March 11, 2013, and we were married on August 3, 2013.  For those of you who just did the math in your head, yes, that is less than five months to plan an entire wedding and reception meal.  At the time, I thought it would be just enough time to plan the perfect Tennessee outdoor wedding, and with the help of some of the best women I know, it was.  With each success story, is usually a backstory that, often times, does not get told.  However, to understand the importance I place on having a wedding planner as a planner, I will share my stressful backstory that led up to a beautiful and perfect wedding.

Less than five months, and a less than extravagant wedding budget can leave you feeling desperate.  I first began searching for the perfect location and assigning friends to the wedding party.  After almost two months of searching, I found the perfect location for my wedding and reception, the Inn at Evins Mill.  After a meeting with the owner and some of the staff, I knew that it was the perfect fit for my budget and wedding dreams.  I chose to do an all-inclusive wedding, with the inn providing everything at my disposal.  From meal, to set-up, to night-of accommodations, it had all been taken care of.  The all-inclusive choice, something I had previously under appreciated, now became the only way to my timely wedding day bliss. 

Our wedding party was what we in the event industry considers relatively small, three bridesmaids, three groomsmen, one junior bridesmaid and a ring-bearer.  We wanted a small and intimate feel, but it was all we could do to recruit our party.  With my fiancée in Indiana, my sister living in Mexico, a bridesmaid in Washington D.C., and groomsmen in Kentucky, we were all so spread out that it became a major stressor.  Fortunately, I had decided on mix-match dresses in mint, and they all looked fabulous, but it was certainly a lot to handle. 

With being a Do-It-Yourself bride comes a lot of responsibilities.  I did almost every aspect of my wedding myself.  I made all of the floral arrangements, centerpieces, bouquets, accessories, and decorations.  It took months to complete, but it saved my parents a lot of money.  As a planner and bride, I would like to offer some advice and hopefully some comforting news.  The comfort comes with knowing that even wedding planners get stressed about planning and executing their own weddings.  We are not immune to the stress, bridesmaid drama, family spats, or unwanted advice from the in-laws. 

 So, here is my advice to all the current brides.

 -  HIRE a wedding planner.  Trust me, no matter how much you can do by yourself, you will want some help.  Even if you only want a month of planner, they will be invaluable to you.

 -  PLAN accordingly to your budget.  Often times I am asked about my budget and how I managed to have a four course meal and outdoor ceremony for a reasonable price, my answer is planning.  If you look at the season deals vendors offer, you can usually save yourself some money.

-  RELY on those closest to you to help out.  I think this is where I went wrong.  I depended on myself to do so much, but I never stopped to ask for help from those around me.  Your planner, your family, and your friends all want to be a part of your big day, so give them a task and let them relieve some of that built up stress.

 -  FLOW with the punches.  If your junior bridesmaid dress never arrives, and the family has to go find a dress the day before the wedding, that is okay.  Sometimes, especially as a planner, we are thrown into situations that we cannot control, so just be flexible and everything will turn out beautifully.

-  REMEMBER what the big day is all about.  At the end of the night, when I was throwing my bouquet and sending off sky lanterns with all of my closest friends and family, I was reminded of just how special my big day was.  It was not because the entree was amazing or that I held it together during my vows, but it was simply a celebration of love and commitment that Tyler and I made in the presence of our honored guests.
 
From one bride to another I can honestly say that wedding planners understand your stress.  They have designed many weddings and are indispensable to your big day.  Even as a planner, without Kelly and Susan of Decadent Details at my side before I walked down the aisle, I might have given into that moment of faintness.  I could not have enjoyed my Vintage Shabby Chic wedding without some of the key players behind the scene, because a wedding takes more than a bride with a plan.
 
Pictures provided by Haily Daine Williams


Wednesday, September 4, 2013

If the Shoe Fits…

Written by Decadent Details Assistant, Mallory Worstell


This is your day and all eyes are on you. We all know how important finding the perfect wedding dress is... But what about finding the perfect shoe?

Flowers, invitations, dates, venues, dresses after dresses, centerpieces; you’ve made sure to find all the perfect details for your wedding day, so why stop when it comes to your shoes? Just like wedding dresses, there are a variety of shoes to choose from. But how do you know which one is right for you? Maybe you are a simple bride who wants to add a touch of fun in her footwear, or maybe you are a bride who prefers to be unlike any other bride, regardless of your taste there is a shoe for you! 
 
Pops of color and pattern can be a great way to brighten up your wedding day as well as your pictures. Whether it be the bridesmaids footwear, or yours and the grooms, everyone is sure to notice these fun pops of color and personality. Make it a subtle or lavish statement with these options 

Add a burst of color to your whole bridal party with these colorful shoes!


Link                                                      Link                                                          Link               Link
 
 
Be fierce on your big day by incorporating a touch of animal print into your footwear.


Link           Link           Link

Show off your fun and flirty side with cute polka dot patterned heels!
 
 
Link     Link     Link     Link
 

Looking to be more comfortable on your big day? These choices are perfect for the bride who prefers the nontraditional style, while still staying extremely stylish! Whether it be dancing or walking down the sandy beach, the bride can feel at ease with any of these picks.

Cowboy boots are the perfect way to play up a rustic style themed wedding.
 
 
Link     Link     Link
 
Flip flops with rhinestone embellishments are a great option for beach weddings, or brides who prefer being stylishly comfortable!
 
Link     Link     Link     Link
 
Staying on the more casual side, this unconventional wedding sneaker will be sure to draw attention to your spunky personality!
 
Link     Link    Link     Link
 
Maybe the simple white high heel just isn’t enough for you on your big day. Your dress is a statement of your personality, so why not have a shoe to go along with it? Adding a simple bow to your wedding shoe can be the perfect touch of fun and flair to your wedding attire. Here are a few possibilities on how to get the look just right!  
Ultra glam rhinestone bow; ready for any runway… or wedding aisle!


Link     Link     Link     Link     Link
 
Vintage pearl bows; perfect for a shabby chic wedding day.
 
 
Link     Link     Link     Link
Simple, yet elegant bow; the perfect blend of sophistication and sass.
                                         
 
Link     Link   Link
 
No matter what your style, remember the perfect shoe helps to finish the look!

Thursday, July 18, 2013

Glam, Romance, and 1920's Inspiraton...

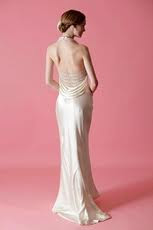
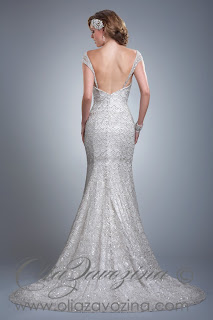
We are so excited that 1920s Glam was all over the runways this season and wedding gowns are no exception. We love the Glam, Jazz, bling, romance and the thrill and decadence of the 1920's and wanted to share some of our favorite gowns!


We hope we have given you some inspiration to embrace your glamorous, romantic side!

Wednesday, July 10, 2013

Setting the Table

We love to throw a party! Doesn't matter if it's impromptu, casual or formal...we love to entertain our friends and family!!! With that said, we thought it would be fun to take a look at different table settings for different occasions. Never hurts to brush up on table setting etiquette! No one wants to be counting the number of fork tines to figure out which one to use!

Setting a table is not as difficult as it seems. The basic rule is: Utensils are placed in the order of use, that is, from the outside in. A second rule, with only a few exceptions is: forks go to the left of the plate, and knives and spoons go to the right.


Basic Table Setting


For a basic table setting, here are two great tips to help you -- or your kids -- remember the order of plates and utensils:

1.Picture the word "FORKS." The order, left to right, is: F for Fork, O for the Plate (the shape!), K for Knives and S for Spoons. (Okay -- you have to forget the R, but you get the idea!)

2.Holding your hands in front of you, touch the tips of your thumbs to the tips of your forefingers to make a lowercase 'b' with your left hand and a lowercase 'd' with your right hand. This reminds you that "bread and butter" go to the left of the place setting and "drinks" go on the right. Emily Post could have used that trick -- she was often confused about which bread and butter belonged to her -- and sometimes she used her neighbor's! In which case, when it was called to her attention, she would say to the dismayed lady or gentleman, "Oh, I am always mixing them up. Here, please take mine!"

Some other things to know:

•Knife blades always face the plate

•The napkin goes to the left of the fork, or on the plate

•The bread and butter knife are optional

Informal Place Setting


When an informal three-course dinner is served, the typical place setting includes these utensils and dishes:


Our illustration shows how a table would be set for the following menu:

•Soup course

•Salad or first course

•Entree

•Dessert

(a) Dinner plate: This is the "hub of the wheel" and is usually the first thing to be set on the table. In our illustration, the dinner plate would be placed where the napkin is, with the napkin on top of the plate.

(b) Two Forks: The forks are placed to the left of the plate. The dinner fork, the larger of the two forks, is used for the main course; the smaller fork is used for a salad or an appetizer. The forks are arranged according to when you need to use them, following an "outside-in" order. If the small fork is needed for an appetizer or a salad served before the main course, then it is placed on the left (outside) of the dinner fork; if the salad is served after the main course, then the small fork is placed to the right (inside) of the dinner fork, next to the plate.

(c) Napkin: The napkin is folded or put in a napkin ring and placed either to the left of the forks or on the center of the dinner plate. Sometimes, a folded napkin is placed under the forks.

(d) Dinner Knife: The dinner knife is set immediately to the right of the plate, cutting edge facing inward. (If the main course is meat, a steak knife can take the place of the dinner knife.) At an informal meal, the dinner knife may be used for all courses, but a dirty knife should never be placed on the table, place mat or tablecloth.
(e) Spoons: Spoons go to the right of the knife. In our illustration, soup is being served first, so the soup spoon goes to the far (outside) right of the dinner knife; the teaspoon or dessert spoon, which will be used last, goes to the left (inside) of the soup spoon, next to the dinner knife.

(f) Glasses: Drinking glasses of any kind -- water, wine, juice, iced tea -- are placed at the top right of the dinner plate, above the knives and spoons.

Other dishes and utensils are optional, depending on what is being served, but may include:
(g) Salad Plate: This is placed to the left of the forks. If salad is to be eaten with the meal, you can forgo the salad plate and serve it directly on the dinner plate. However, if the entree contains gravy or anything runny, it is better to serve the salad on a separate plate to keep things neater.

(h) Bread Plate with Butter Knife: If used, the bread plate goes above the forks, with the butter knife placed diagonally across the edge of the plate, handle on the right side and blade facing down.

(i) Dessert Spoon and Fork: These can be placed either horizontally above the dinner plate (the spoon on top with its handle facing to the right; the fork below with its handle facing left); or beside the plate. If placed beside the plate, the fork goes on the left side, closest to the plate (because it will be the last fork used) and the spoon goes on the right side of the plate, to the right of the dinner knife and to the left of the soup spoon.

(j) Coffee Cup and Saucer: Our illustration shows a table setting that would be common in a restaurant serving a large number of people at once, with coffee being served during the meal. The coffee cup and saucer are placed above and to the right of the knife and spoons. At home, most people serve coffee after the meal. In that case the cups and saucers are brought tot he table and placed above and to the right of the knives and spoons.

Formal Place Setting


The one rule for a formal table is for everything to be geometrically spaced: the centerpiece at the exact center; the place settings at equal distances; and the utensils balanced. Beyond these placemats, you can vary flower arrangements and decorations as you like.

The placement of utensils is guided by the menu, the idea being that you use utensils in an "outside in" order. For the illustrated place setting here, the order of the menu is:

•Appetizer: Shellfish

•First Course: Soup or fruit

•Fish Course

•Entree

•Salad

(a) Service Plate: This large plate, also called a charger, serves as an underplate for the plate holding the first course, which will be brought to the table. When the first course is cleared, the service plate remains until the plate holding the entree is served, at which point the two plates are exhcnaged. The charger may serve as the underplate for several courses which precede the entree.

(b) Butter Plate: The small butter plate is placed above the forks at the left of the place setting.

(c) Dinner Fork: The largest of the forks, also called the place fork, is placed on the left of the plate. Other smaller forks for other courses are arranged to the left or right of the dinner fork, according to when they will be used.

(d) Fish Fork: If there is a fish course, this small fork is placed farthest to the left of the dinner fork because it is the first fork used.

(e) Salad Fork: If the salad is served after the entree, the small salad fork is placed to the right of the dinner fork, next to the plate. If the salad is to be served first, and fish second, then the forks would be arranged (left to right): salad fork, fish fork, dinner fork.

(f) Dinner Knife: The large dinner knife is placed to the right of the dinner plate.

(g) Fish Knife: The specially shaped fish knife goes to the right of the dinner knife.

(h) Salad Knife (Note: there is no salad knife in the illustration): If used, according to the above menu, it would be placed to the left of the dinner knife, next to the dinner plate. If the salad is to be served first, and fish second, then the knives would be arranged (left to right): dinner knife, fish knife, salad knife.

(i) Soup Spoon or Fruit Spoon: If soup or fruit is served as a first course, then the accompanying spoon goes to the right of the knives.

(j) Oyster Fork: If shellfish are to be served, the oyster fork goes to the right of the spoons. Note: it is the only fork ever placed on the right of the plate.

(k) Butter Knife: The small spreader is paced diagonally on top of the butter plate, handle on the right and blade down.

(l) Glasses: These can number up to five and are placed so that the smaller ones are up front. The water goblet (la) is placed directly above the knives. Just to the right goes a champagne flute (lb); in front of these are placed a red (lc) or white (ld) wine glass and a sherry glass (le).

(m) Napkin: The napkin is placed on top of the charger (if one is used) or in the space for the plat

In General:

•Knife blades are always placed with the cutting edge toward the plate.

•No more than three of any implement is ever placed on the table, except when an oyster fork is used in addition to three other forks. If more than three courses are served before dessert, then the utensil for the fourth course is broght in with the food; likewise the salad fork and knife may be brought in when the salad course is served.

•Dessert spoons and forks are brought in on the dessert plate just before dessert is served. Link

Regardless if you are throwing the party or a lucky recipient to a wonderful soiree, it is always good to know which fork to use!  Enjoy the Party!!!